PURPOSE
This tutorial is a supplement to the article of oracle published here. After reading this later, I decided to share some tips about this EE environment configuration.
INTRODUCTION
Two years ago, we decided to move to JEE 6 for our enterprise solutions and take a lot of fun with new EJB 3.1 features and annotations. Glassfish has made our lives easier, it was very easy to declare variables using it’s administration console. Less complicated than using ejb-jar.xml are two methods using Glassfish server and resources :
I- OLD FASHION WITH RESOURCE PER PARAM (SIMILAR TO ORACLE TUTORIAL)
- Declare an EJB with toBeInjected resource : ```java import javax.annotation.Resource; import javax.ejb.Stateless; import javax.ejb.LocalBean; /** * * @author slim */ @Stateless @LocalBean public class MyEjbBean { @Resource(lookup="resName") protected String toBeInjected; //// } ```
- Open admin console ( localhost:4848 by default ) -> Resources -> Custom Resources -> New -> and fill the informations as below
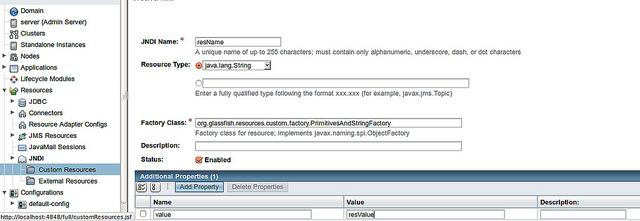
At first glance, it looks simple and fast forward but problems start after just after a first project.
Problems ! Why ?
We achieved more than 20 variables and some resource names begin to confuse them. I was very hard for our operations team to catch the name of the correct setting and update its value. It was necessary to group parameters resources into a single resource by project.
NEXT FASHION : GROUPING RESOURCES
In this section I will use scala (similar class can be translated easy to java).
- First of all, we need to create our single resource class as simple bean ```java package me.slim.ouertani class Ressource { var param1 : String = _ var parma2 : String = _ } ```
- Next, let's create a resource factory class :
package me.slim.ouertani
class RessourceFactory extends ObjectFactory {

  override def getObjectInstance(obj: Object, name: javax.naming.Name, nameCtx: javax.naming.Context, environment: Hashtable[_, _]): Object = {
    val ressource = new Ressource();
    val reference = obj.asInstanceOf[Reference];
    val attributes = reference.getAll();
    while (attributes.hasMoreElements()) {
      val refAddr = attributes.nextElement().asInstanceOf[RefAddr];
      init(ressource, refAddr.getType(), refAddr.getContent());
    }
    return ressource;
  }

  private[this] def init(ressource: Ressource, tipe: String, content: Object) {
    tipe match {

      case "param1" => ressource.param1 = content.toString()
      case "param2" => ressource.param2 = content.toString()

    }
  }
}
The purpose of object factory is to read injectable parameters and populate a resource class
- Jndi Name => the resource name to be used by project for example
- Resource Type => check second radio button, and fill the resource full name ( with package)
- Factory class => Our RessourceFactory class full name ( with package)
- Add two (or more) properties to be injected in our resource class.</ol> 
- At the end we inject our resource in EJB class : ```java @Stateless @LocalBean class MyEjbBean { @Resource(lookup="globalRes") protected var res:Ressource= _ /// res.param1 } ```